
Set up Snap2CRM and get scanning
Practical, step-by-step guides for connecting HubSpot, preparing your forms, scanning business cards, and configuring advanced features.
From installation to your first HubSpot contact
The essentials follow one clear path. Complete these three guides in order, then explore advanced settings when you need them.
Install Snap2CRM
Add Snap2CRM through HubSpot Marketplace and connect your HubSpot account.
Set up a HubSpot form
Choose the connected form that should receive reviewed business-card data.
Capture your first contact
Scan, review, and submit the data so HubSpot can handle contacts and automation.
Find the guide you need
Choose a topic below. Each guide keeps the steps, screenshots, and product details together in one place.
Snap2CRM Documentation
Installation
Get Snap2CRM connected to your HubSpot account in just a few steps – no technical setup required.
Last modified: November 25, 2025
Installation
Click on the installation button provided below to go to HubSpot. Log in to your HubSpot account if needed, then simply follow the installation steps HubSpot provides.
In-depth instructions for installing the app to your HubSpot account
Add our Domain to Allow List
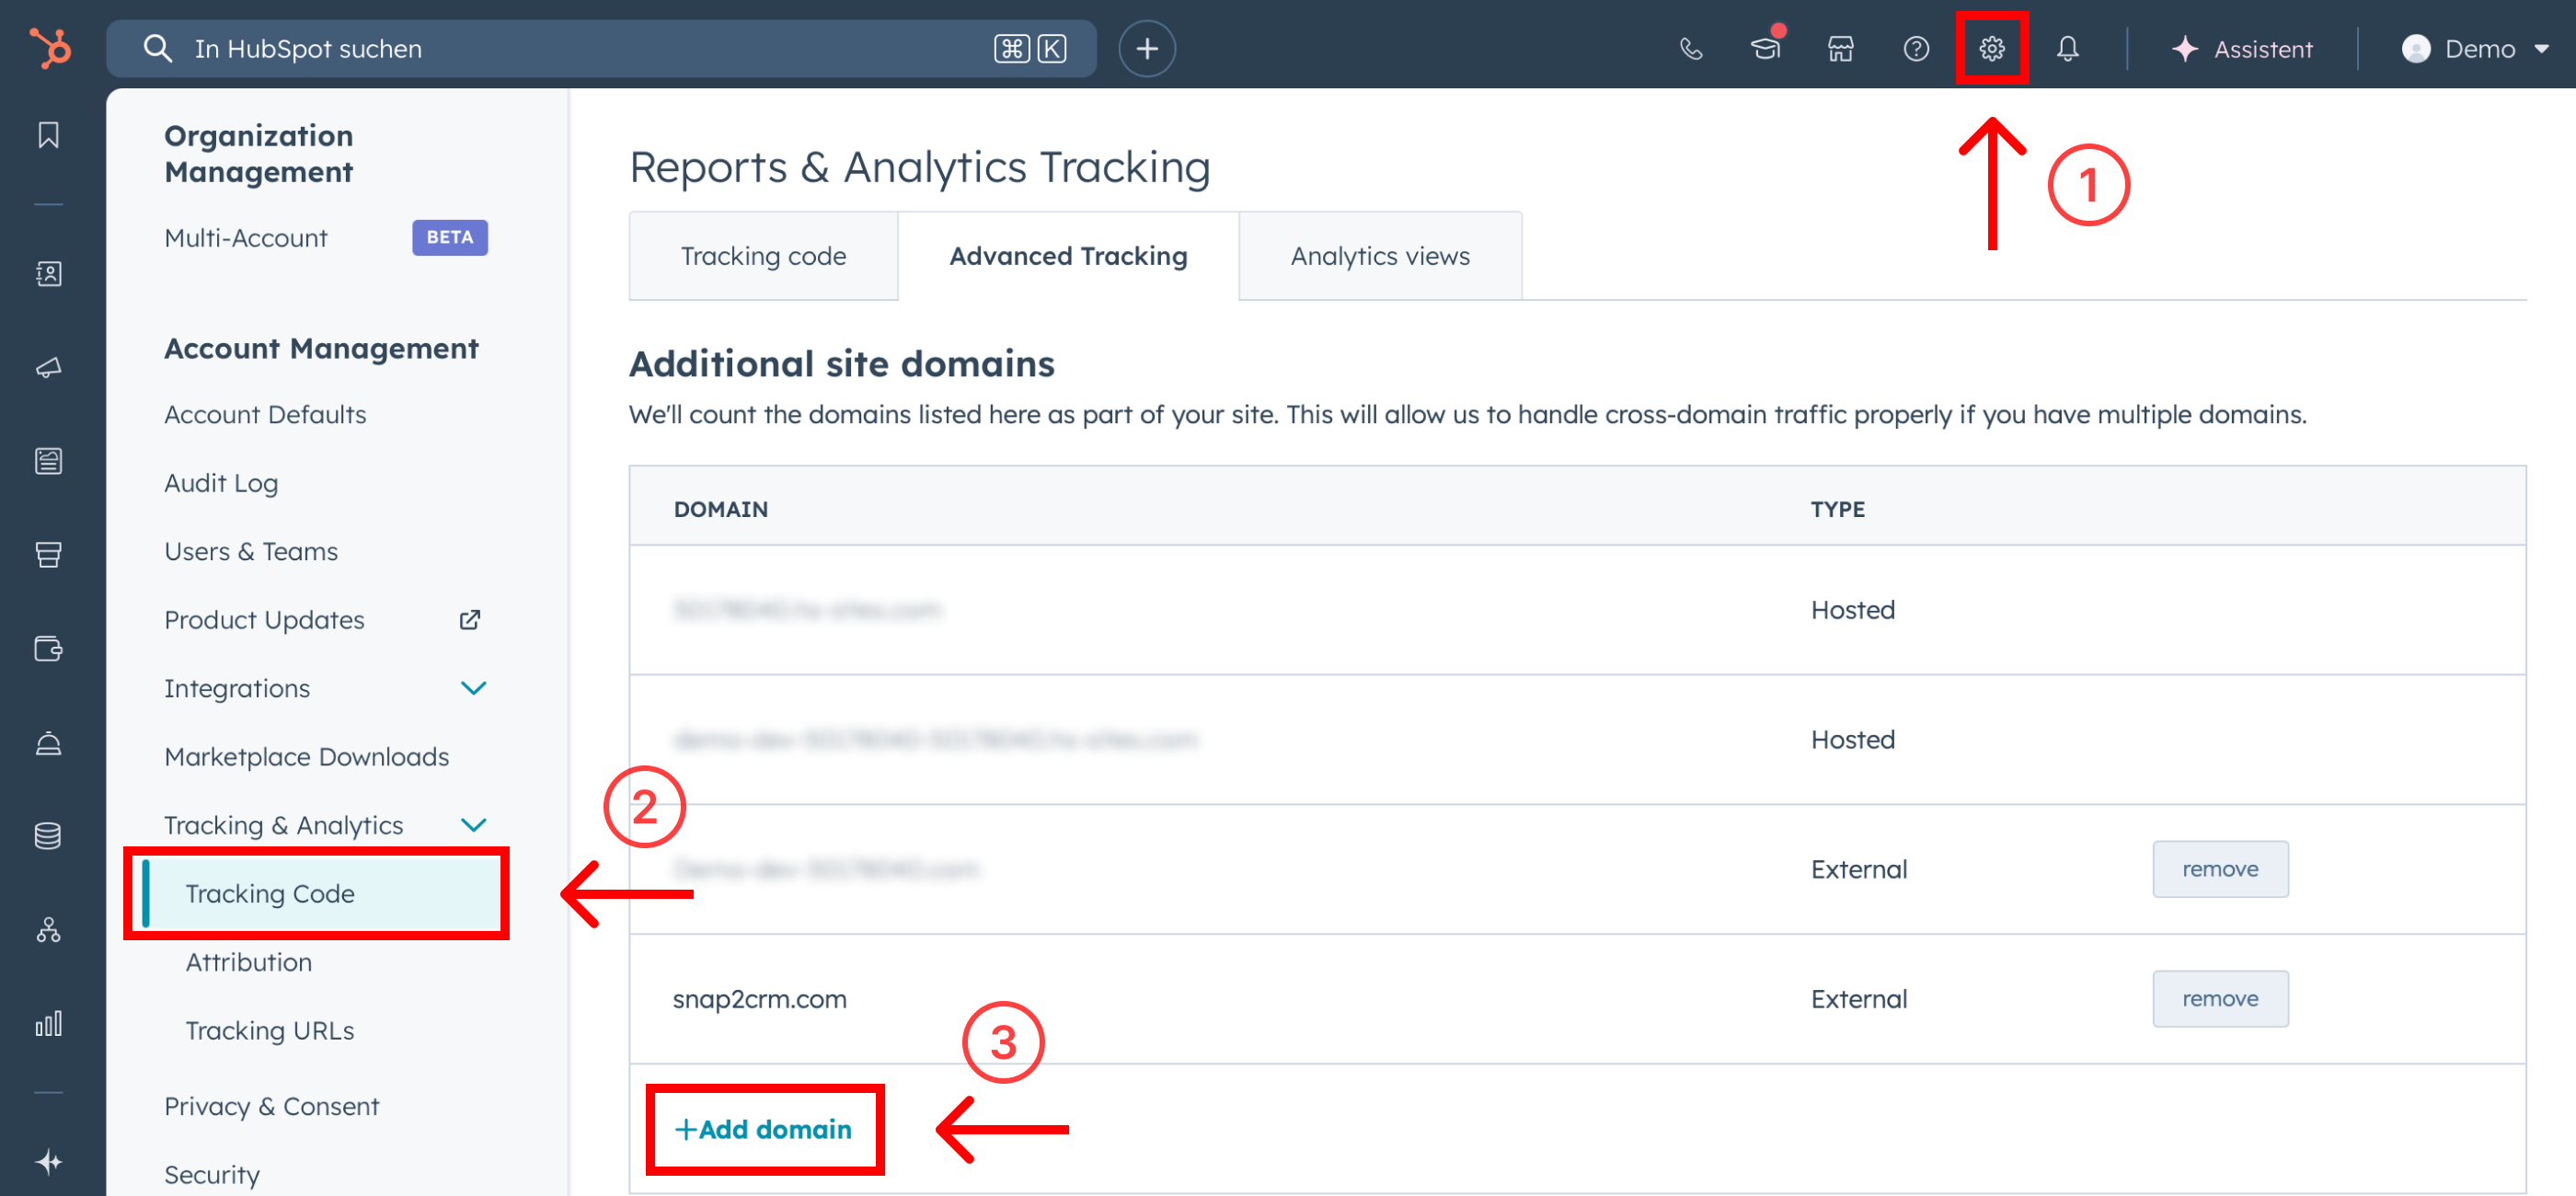
To ensure smooth operation, add our domain to your allow list in HubSpot.
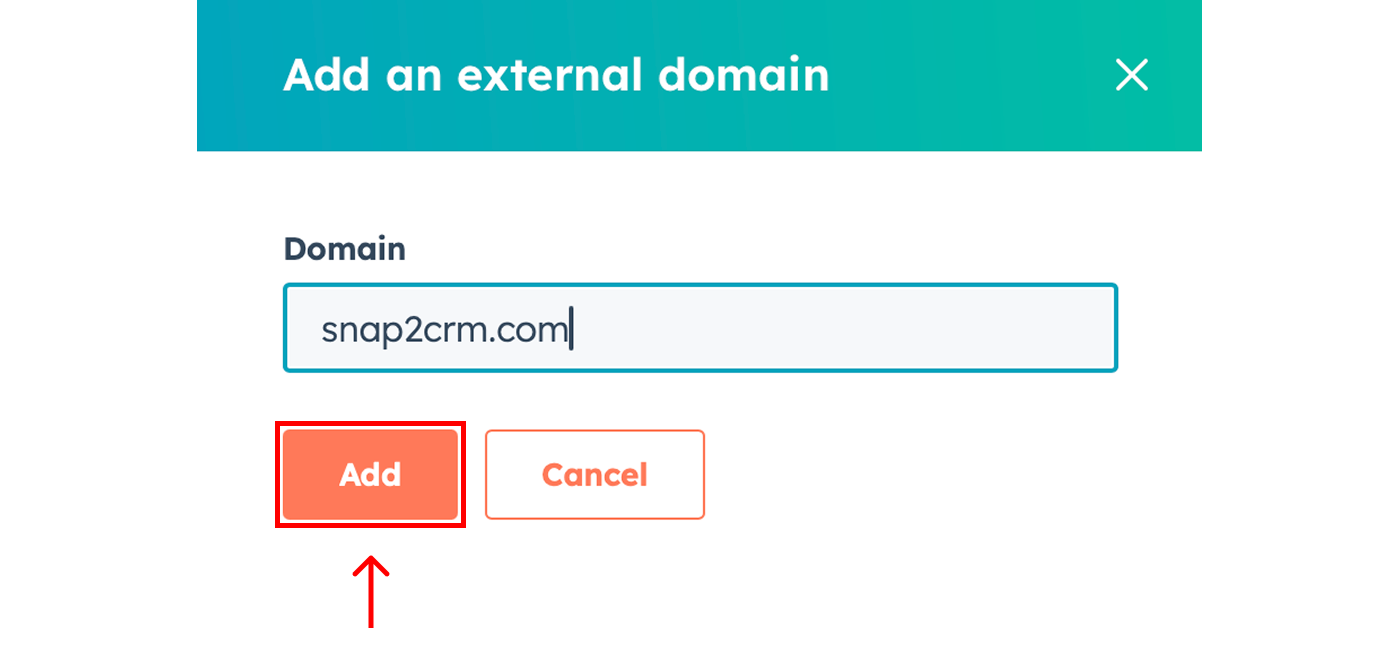
Go to Settings → Tracking & Analytics → Tracking Code → Advanced Tracking → Additional Site Domains, then add:
snap2crm.com
Install the Mobile App
Download the business card scanner app using the links provided.
Snap2CRM is available for both iOS and Android.


Register to Get Login Credentials
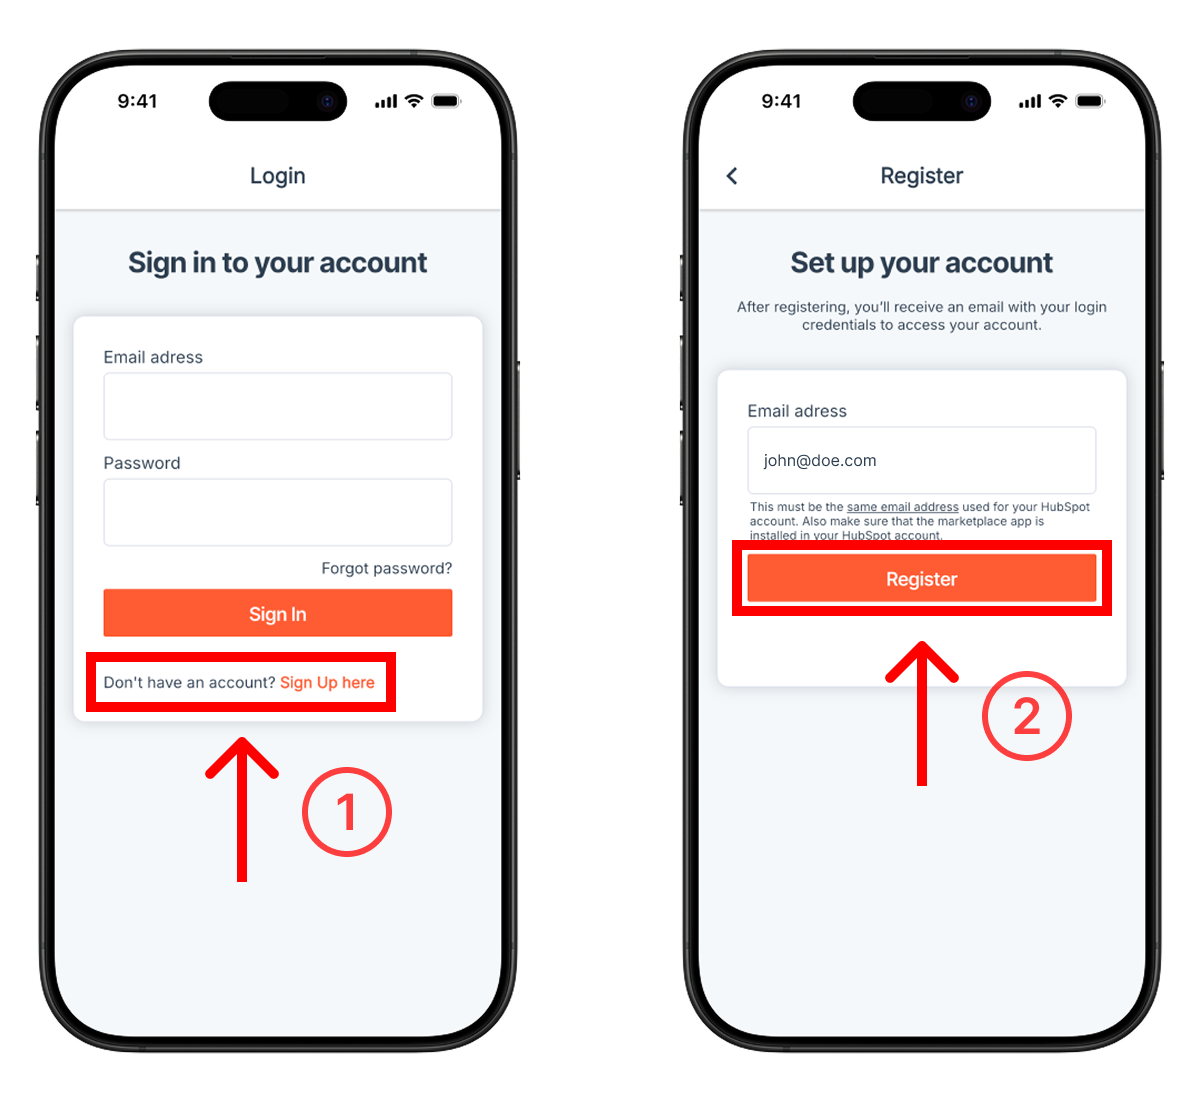
Open the Snap2CRM app and tap “Sign Up here” at the bottom of the login screen. Then enter your email and tap “Register”. You’ll receive an email with your login credentials shortly after.
Snap2CRM Documentation
Set up a form
This guide shows you how to connect a HubSpot form with Snap2CRM to automatically sync scanned contact data.
Last modified: March 11, 2026
Create or Select Your Form
To begin, either create a new form in HubSpot or use an existing form you already have created.
Why should I use multiple forms?
Forms built with the new editor are not supported. This is due to a technical limitation on HubSpot’s side. As soon as HubSpot provides support for the new editor, we’ll make it available in Snap2CRM.
Add our Property
Add the following property to your form:
snap2crm_enable
Don’t worry – this property will not be visible on the form later.
Enable Raw HTML
In your form settings, go to “Style & Preview” and set the form to “Set as raw HTML.” Also make sure the form is published.
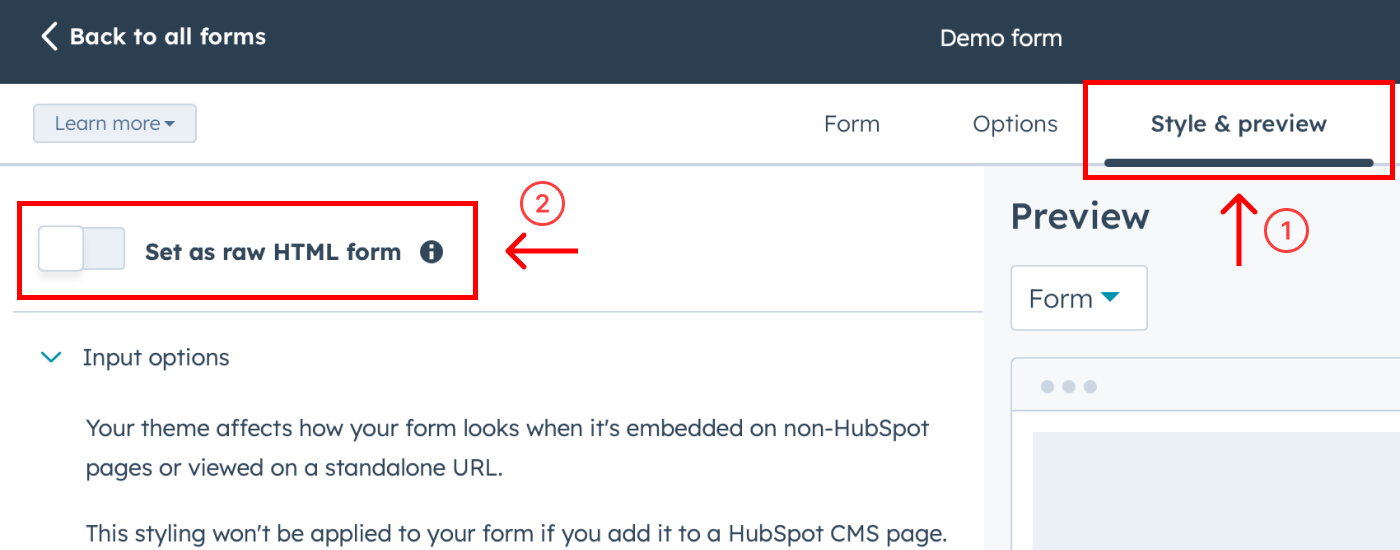
After completing these steps, your form will automatically appear in the mobile app and is ready to use for scanning business cards.
Customize the Display Name (optional)
By default, the form name will be used in the app when displaying your form.
If you want to customize the display name and subtitle in the app, you can add:
snap2crm_title – to set a custom title.
snap2crm_subtitle – to set a custom subtitle.
To set these:
- Add the properties snap2crm_title and/or snap2crm_subtitle to your form.
- Click on the property in the form editor.
- Set your desired name under “Default value”.
These values will be displayed in the app, allowing you to keep your internal form name clean while showing a user-friendly title to your team.
Snap2CRM Documentation
Scan a business card
Follow these steps to scan a business card and send the contact to HubSpot in seconds.
Last modified: November 25, 2025
Open the mobile app on your smartphone
Log in using your email and password.
If you’re logging in for the first time, tap “Register” to set your password.
Click on a form
Tap on a form you’ve previously set up. Grant camera access if prompted.
For setup instructions, see the “Set up a form” guide.
Scan the business card
Hold the card in front of your camera and tap the capture button.
Make sure it’s well-lit and clearly visible.
Review and edit the data
Snap2CRM automatically extracts contact details.
You can adjust fields like name, email, or phone if needed.
Optional: Add a note (see “Advanced Settings” for setup.)
Submit to HubSpot
Tap “Submit” to create or update the contact in your HubSpot CRM.
With Snap2CRM, scanning a business card and sending the contact to HubSpot takes just a few seconds.
Snap2CRM Documentation
Advanced settings
Add notes to scanned contacts, control form access by user, and manage contact ownership with powerful customization options.
Last modified: November 25, 2025
Enable notes (available on Pro and higher)
Allow users to add notes to contacts immediately after scanning by using the property:
snap2crm_notes_enable
To activate this feature:
- Add the property snap2crm_notes_enable to your form.
- Set the property’s default value to “enable”.
Once enabled, users will see a notes field after scanning a contact, making it easy to capture context and details while the information is fresh.
Dynamic contact ownership assignment (available on Pro and higher)
Automatically assign the scanning user as the contact owner using the property:
snap2crm_owner_assignment
To set this up:
- Add the property snap2crm_owner_assignment to your form.
- Set the property’s default value to define when ownership should be assigned:
- Always – The scanning user will always be set as the contact owner.
- Only if no owner is set – The scanning user will be assigned only if the contact does not already have an owner.
- Never – The scanning user will not be assigned as the contact owner.
This ensures flexible ownership handling that aligns with your team’s HubSpot workflows.
Selective form access (available on Business and higher)
Control which users can see a form in the mobile app using the property:
snap2crm_user_access
To set this up:
- Add the property snap2crm_user_access to your form.
- Add the users who should have access to the form to the property’s default value.
- If no users are added, the form will be visible to all users by default.
This allows you to manage team-specific forms easily while keeping your app organized.
Snap2CRM Documentation
Add a subscription
Unlock more scans, choose a paid plan and activate premium features like increased scan limits, note sync, and ownership rules by choosing the right plan for your team.
Last modified: November 25, 2025
Open the settings page
Open HubSpot and go to the settings page.
Go to Integrations → Connected Apps → Snap2CRM.
Open Settings tab.
Choose a plan
Click on the Subscription tab to view available plans. Choose a plan and follow the steps to complete your subscription.
Done
Enjoy your subscription. If you have any question feel free to contact our support anytime.
Snap2CRM Documentation
Activate EU Data Residency (EU-only Hosting)
Keep all Snap2CRM processing on EU servers by activating EU-only data residency – ideal for strict compliance requirements.
Last modified: February 03, 2026
What is EU data residency?
EU data residency means that relevant data processing and storage happens within the European Union. For many companies, this is an important requirement to support internal compliance policies and GDPR-related processes. Snap2CRM is hosted in the EU by default. However certain processors may involve limited data handling by sub-processors outside the EU.
With EU-only data residency, Snap2CRM is configured so that all data processing for your Snap2CRM setup takes place on EU-servers. This means no data is processed or handled outside the EU as part of your Snap2CRM configuration.
How to activate EU-only data residency
Activating EU-only data residency is simple – there’s no additional cost, no special tier, and no contract changes required.
You can activate it in one of two ways:
- Submit a request via our portal: Click here to request EU-only data residency via our support portal.
- Email support: Write us a mail to support@snap2crm.com
Activation time & cost
- Typical activation time: within 24 hours
- Additional cost: none
What we need from you
To process the request quickly, please include:
- Your HubSpot Portal ID
- The email address of the HubSpot user who installed Snap2CRM (if known)
Limitations:
EU-only data residency applies to the Snap2CRM app and its backend services only. It does not apply to:
- the Snap2CRM website on https://snap2crm.com
- distribution and related processing by the Apple App Store or Google Play Store (these platforms are operated by Apple/Google and are outside of our control)
- payments, billing, and related processing via Stripe (operated by Stripe and outside of our control)
- any data stored or processed within your HubSpot account/portal (HubSpot acts as a separate controller/processor under your HubSpot agreement and configuration – you are responsible for your HubSpot data residency and compliance settings)
Snap2CRM Documentation
Uninstall Snap2CRM
If you wish to disconnect Snap2CRM from your HubSpot portal, you can do so by uninstalling the app directly from HubSpot’s settings.
Last modified: November 25, 2025
Steps to Uninstall:
- Log in to your HubSpot account.
- Go to Settings → Integrations → Connected Apps.
- Select Snap2CRM from the list.
- Click Actions → Uninstall.
- Confirm the uninstallation when prompted.
What happens after uninstallation:
- Uninstallation will revoke Snap2CRM’s access to your HubSpot data and stop all syncing.
- Your HubSpot forms and custom properties created by Snap2CRM will not be deleted.
You can reinstall the app at any time, and all previously connected forms will remain usable. - Active subscriptions must be cancelled separately via the Stripe customer portal.
Uninstalling the app from HubSpot does not cancel your paid plan. You can manage or cancel your subscription at any time by following the link provided in your billing emails or by contacting our support team. - Your Snap2CRM account will remain active unless you request full account deletion.
Get help or explore Snap2CRM with a demo account
Visit support for setup questions, or request a demo account to try the complete workflow with your own use case.